Tuesday, May 28, 2013

Stocking Progress


I started a stocking for my son-in law some months ago.  I like to have a project in the evening so that when I spend an inordinate amount of time watching TV, I don't feel like such a slug. Then I am not wasting time.  I am being productive!

Each of our children has a stocking I made.  Back in the day.  And they were all crewel, which I LOVE.  If I won the lottery, I would bring back crewel kits for stockings.  Now you can only get cross stitch or needlepoint designs. Crewel has many different stitches and is more like a picture, I think.  But as you can't get them any more and I now have the problem (joy) of getting additional "children" through marriage, I have to make more stockings.

I was able to find a stocking kit for my daughter-in-law that was very similar in design to my son's, but now I have a son-in-law.  And this is what I settled on.  I think it is very evocative of a Christmas scene. 


I have been working on it for months and this is as far as I have gotten.


I work for an hour or two most nights and a few all day sessions when it is rainy and I don't feel like doing anything useful.


 Look at those itty bitty stitches.  And so many more to go.


There is a jumble of yarns on top of Lee's dresser and I can't dust them, so there they sit getting dusty.  And probably covered in cat hair.


Here it is almost summer and I am feeling the pressure.  Gotta get it done.  Of course, I still have a quilt I have to get done.  And the basement remodel.  But progress is being made all around.  Just not fast enough for me to cross anything off a list.  GOOD THING I AM SO PATIENT.  not.

Now I have to go figure out how to put an embroidery label on my quilt.  I may or may not show that, depending on how it comes out!

Monday, May 27, 2013

Memorial Day


When did Memorial Day turn into an excuse for a sale?  I don't know, but we have been saving up a large number of purchases to coincide with Memorial Day.  Because Lee is a veteran, he gets an additional discount at Lowe's on Memorial Day and we decided to take advantage of it.  Lee finished installing the last of the kitchen appliances and we were ready for the next big purchase.  With the dubious help of RJ.


I am the world's worst decider.  Should I, shouldn't I?  I have a hard time with menus, you can imagine the difficulty with large, read expensive and permanent, purchases.  So we have been spending an inordinate amount of time in various big box DIY stores.  Lowe's and Home Depot.  Home Depot and Lowe's.  We generally end up at Lowe's, mostly because of their proximity, 20 minutes versus 40 minutes.  If you have to go back for a part or a return, that extra time can really add up.


Are you aware the Home Depot has 200 types of toilets for sale.  TWO HUNDRED.


I am convinced Lowe's has an equal number.  You can get a short one.  That won't work for me because my aunt informed me that she had to be boosted off the last short toilet she used.  So a tall one.  Then they have round bowls and oval ones.  White and biscuit.  (Seriously, though, you gotta have white, if only to convey the absolutely cleanliness of said vessel.)  They have toilets with extra power.  The idea of a powerless, unflushed bowl doesn't work for me, so put me down for powerful.  Lots of choices.

I like this bath vanity, but will it go in that room?  I LOVE it.  How much????  Never mind.   Like that.

The point of the many trips was to get a definitive list of all the large remaining purchases for our remodel.  I have lists, Lee has lists.  There are lists of the lists.  Then we could just walk in, order and leave.  Easy peasy. 

Oh, how naïve and trusting you are.

So we spent the Sunday going from place to place, double checking, deciding and finally we are done.  Two bath vanities ordered.  And the tops.  Don't forget the mirrors.  Two toilets, tall and powerful.  Sorry, short people.  I will get you a step.  We bought the various faucets and a light fixture and the big purchase, the granite counter for the kitchen. 


A huge bill, but we saved over $500.  And it is too late for me to change my mind.

So now we are at the true Memorial Day.  Lee didn't get the BBQ gene and doesn't much care for it.  And we have no family close by this weekend, so we are going to the Buchanan Community House  http://www.townofbuchanan.com/attractions/wilson-warehousecommunity-center/  to eat a chicken dinner and support a worthy cause.   They are holding a fund raiser for the Fairview Cemetery Association following a service at the cemetery honoring veterans past and present.  There are a few different meals to raise funds held at the Community House in Buchanan.  We try to go to all of them.  It is one of the many fun parts about living in a small town.  Come on down and join us!

And a big thank you for your service to all the veterans. 

Saturday, May 25, 2013

A Visitor


Lee told me we had a visitor in the garage.  I figured that meant a bird or lizard or some such.


It was a little box turtle.  I love them.  They are sweet and cute in a boxy truck-like fashion.  I have no idea how he found his way in the garage.


We see them now and then when we work around the property.  My biggest fear is that they will get in the field when the hay is being cut or when we are clearing a new patch of land.  A turtle shell is no match for a bush hog.


So I set him free on the side of our hill that we don't cut.  Run little box turtle....well, saunter little box turtle.  You are free!


New Look


I have had some positive comments on the new look of my blog.  This is all thanks to wwwtheblueridgegal.com  She has helped me so much with the look and I am thrilled.

You, too, can work magic on your blog with a little help.  Not MY help. Check out Diane's blog on the above link and click on the HEADERS link.  You can see some of her many headers and arrange to get yours spiffed up as well.

Not only is she good and creative and artistic, she is FAST.  And I shouldn't mention it, but she is very reasonable.  Have you seen what the Geek Squad charges????

So contact her and tell her you heard about her from me.  Maybe I can get another consult!

Friday, May 24, 2013

Walnut Tarts


On a visit to the White Oak Tea Tavern, I purchased a magazine called Tea Time with wonderful recipes for an afternoon tea.  It has been sitting on my "to make someday" pile of recipes.  I don't dare put the ever growing pile away, because I will never remember to look for it.  Gotta see it to do it.

I had invited a fellow blogger to come up and have tea and had already made the chocolate macarons. ( She has one of my favorite blogs and you can follow her at www.theblueridgegal.com  or just click the link on the right side of my blog. ) Now I needed to make some walnut tarts.  I don't like to do two new recipes for one event, because of the danger of extreme failure.  One failure means you move things around to hide the issue.  Two failures mean a boring tea.

The macarons were made the day before to let the flavors meld and so I felt pretty confident about the tarts.  They turned out pretty good.  They could have used another minute in the oven to crisp the shells.


Walnut Tarts

1 package refrigerated pie dough, 2 sheets
1 large egg
1/4 cup firmly packed brown sugar
2 Tablespoons light corn syrup
2 Tablespoons maple syrup
1 teaspoon butter, melted
1/2 teaspoon vanilla
1/8 teaspoon salt
1/2 cup chopped toasted walnuts


Toast the walnuts.  I used a toaster oven on 300 for about 7 minutes.  Cool them and then chop them and measure out the 1/2 cup you need.  I saved the rest of the chopped nuts for oatmeal in some future morning.

(OK, my eagle eyed friend.  You saw the walnuts in a Ziploc bag.  I made them yesterday and used them today.  I had a lot of things to do this morning and wanted a head start.)


Set the dough out to come to room temperature.  Preheat the oven to 350.  Find the little tartlet pans you bought several years ago. : ) You can do this while you are waiting for the nuts.

Lightly sprinkle flour on a cutting surface.  Carefully unroll the dough.  I used the 2 1/2 by 3 1/2 diamond pans for a template and cut around them.  When I ran out of them I used the round ones.  Cut a bit bigger than the pan.


Lift the cut piece and place it in the pan.  Press it gently to the bottom of the pan and up the sides. 


Try not to stretch it or the tart won't hold together when you take it out.  The excess can be pressed off against the top edge making the crust fit perfectly.  Don't worry, you will have plenty of dough.


In fact you will have a lot of dough left over.  What you should do is wad it up and toss it.  What you should not do is cut it into squares ,sprinkle them generously with sugar and cinnamon and toast them on another pan while you make the filling.  Because then you will place the crispy cinnamon bits on a plate and snack on them.  This would be bad for a person on a diet, if they were to do such a thing.

Prepare 12 to 14 tart pans and then place them in the refrigerator to chill.

Combine the egg, brown sugar, corn syrup, maple syrup, melted butter, vanilla extract and salt in a medium bowl.  Whisk everything together.  Add the walnuts, stir and set aside.


Place the tart pans on a rimmed baking sheet.  Fill them about 3/4 full with the nut mixture.  Give it a good stir every time to make sure the nuts are divided evenly.  Try not to spill on the pan.  The drips will be hard to get off.  Don't ask me how I know this.

Bake until the filling is slightly set and puffed up.  This will take 13 to 14 minutes.  I pulled mine out a bit too soon.  Check to see that the top edges of the crust are LIGHTLY browned.  Don't over cook.  It is hard to see color in the oven and you might need to pull them out to check. 

The puffed filling will fall.  Don't panic.  It is supposed to do that.

Place them on a cooling rack.  When cooled you can remove the pans.  I gently pulled the edges open to loosen them and then used a fork to tease them out if they didn't pop into my hand.


The next time I make these, and I will because they were good and pretty easy, I will try to play around with the flavors.  Rather than maple syrup and vanilla, I am thinking of rum or bourbon.  The only thing I don't know is if I will need to increase the corn syrup.  I had better make a lot and decide!


Serve on a tiered server and have a delightful tea with an interesting new friend.

Thursday, May 23, 2013

Obsessed with Macarons.


I found this book on sale and then on sale after that at Books A Million.  My favorite kind of sale.  There were so many delicious sounding cookies and they were just the right size for an afternoon tea.  I never ...rarely just use one recipe for anything.  What if there is something better out there?  Lots of people were saying how hard these are and then gave tips to make them easier.  Hopefully I have included all the ones you will need to make these.  Because you must.  They were totally delicious.  The only thing is that you need several days notice.  You must start them 2 days before you serve them.  Really...delicious.


Chocolate Macarons with Hazelnut Filling

1 cup powdered sugar
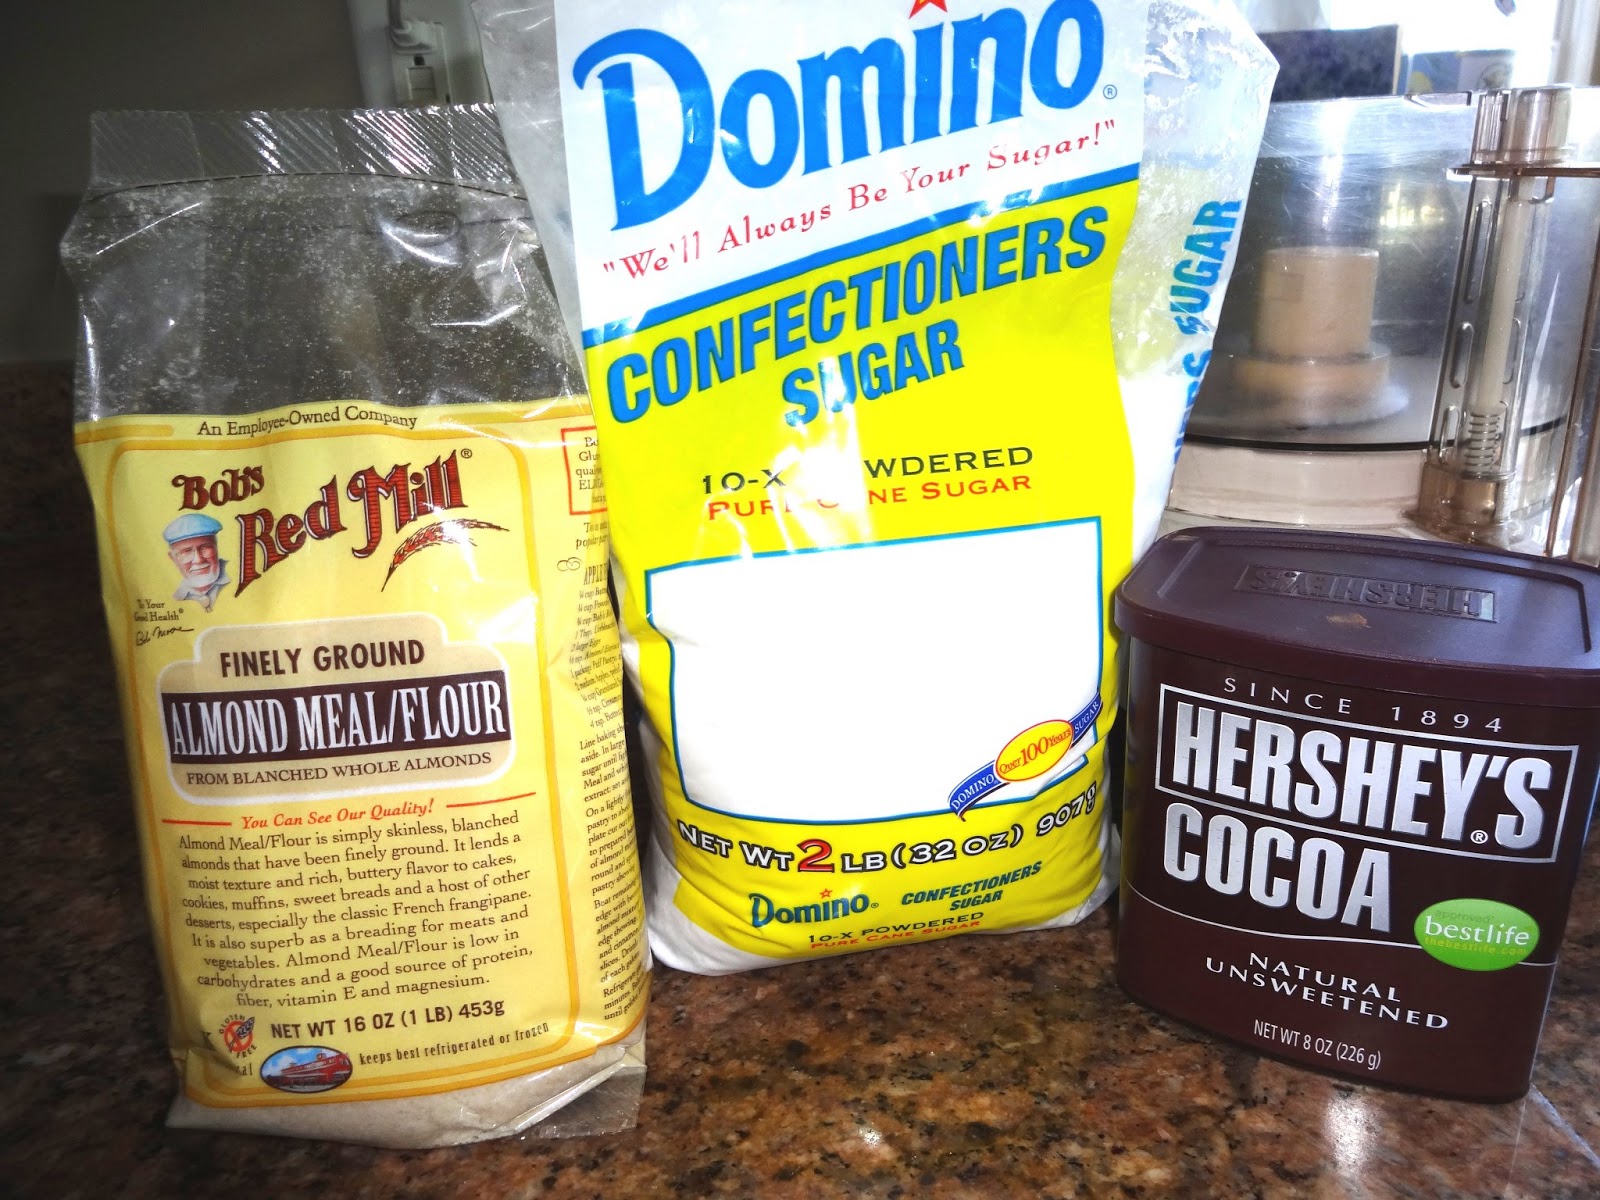
1/2 cup almond flour
3 Tablespoons cocoa powder
2 egg whites, aged and at room temperature...2 days, remember?
1/4 teaspoon cream of tartar
5 Tablespoons granulated sugar

Filling

Nutella


One site told me to age the eggs to get the best macarons.  I did that.  I have no idea if they would be as good if you don't, so put the egg whites in a small bowl, cover them with a paper towel and come back tomorrow.


Get the egg whites out of the fridge.  Set them on the counter, fix yourself a cup of tea and read the paper.

Now you can start.

Place parchment paper on two cookie sheets.  Take a piece of computer paper and draw some 1 1/2 inch circles on it.  I have some cutters that size, so I drew around them and then placed it under the parchment paper.


Combine the powdered sugar, cocoa powder and almond flour (thank you, Aunt Donna.  She found some for me.  I couldn't find any here.) in a food processor.  Pulse into a fine powder, scraping down the sides occasionally.


Sift the mixture into a medium bowl.  There will quite a few large bits.  I put these back into the food processor and ground them up some more.  Sift again. There were still some large bits.  Throw them away.


Beat the egg whites in a large bowl with  an electric mixer.  I used my Kitchen Aid.    Two egg whites were too low to get whipped, so I took the bowl off the mixer and used a whisk, vigorously,  to get them started.  Then I returned the bowl to the Kitchen Aid and whipped them eggs up!


When the eggs are foamy, add the granulated sugar and the cream of tartar, gradually, at high speed, scraping the sides down occasionally. It takes about 2 or 3 minutes.  Stop when the mixture forms stiff, shiny peaks.  Do not over mix or the eggs will break down.  Remove the bowl from the Kitchen Aid.


Add half of the flour mixture and stir gently with a spatula.  Use the least amount of strokes to combine.  You don't want to smash all the air bubbles you just put into the egg whites.  Add the rest of the flour mixture and combine with gentle strokes.  Scoop up from the bottom of the bowl and over the top of the mixture until it is smooth and shiny.  About 15 strokes.  Do not over mix or under mix.

Attach a 1/2 inch piping tip to a piping bag.  I only had a 1/4 inch and it worked OK, but I will be buying a 1/2 inch the next time I can get to a craft store.  If you do not have a piping bag, you can use a quart Ziploc Freezer bag and cut so that you have a half inch hole.  Fill the bag with the batter.

Pipe circles onto the parchment paper.  I used the template on the computer paper and slid it around under the parchment paper to try to get even drops.  I assume I will be able to do these without this assistance with practice.  I did get them a little too thick, but once again I had the wrong tip and it was my first attempt.


Take a moist finger (water, not spit) and gently touch the Hershey's kiss curlicue on the top of each macaron.  This will press it down enough that it will disappear upon baking.

Tap the cookie sheets on the counter to get rid of any air bubbles.  Then let them sit for about 30 minutes to an hour.  You want the macarons to harden slightly so they are no longer sticky.  This will take longer on humid days.  And longer if you used a very wet finger.  When it is no longer sticky, they are ready to bake.

Preheat the oven to 325.  Bake for 7 minutes and then rotate the pans, top to bottom and front to back.  Bake  6 to 8  more minutes for a total of 13 to 15 minutes.  If you can lift the macaron off the parchment paper it is done.

Set the cookie sheets on a cooling rack and let them sit until completely cool.


You can make a chocolate hazelnut filling, or you can buy some Nutella and use that.  You can find it near the peanut butter in the grocery store.  I don't KNOW why no one told you about this before.  Now you know!   It is delicious and easy and then you have some for bagels in the morning.  Very continental.


If you are like me, not every macaron is the same size.  So eyeball them and place similar ones next to each other.  Take about 1/2 teaspoon of Nutella on a knife and spread on the flat side of a macaron.  Top it with one the same size by pressing the flat sides gently together.  Place them in a plastic container and put them in the fridge overnight.  Yes, you can eat the lumpy, weird ones, but don't overdo it.  They will be better tomorrow.  Two day project, remember?


NOW you have to take them out and let them come to room temperature.  The filling will have made the crispy macaron soft and gooey.  The outside will still give a nice crunch and then the gooey goodness of the Nutella will come through.  Seriously.  You have to try these.

I want to try some other flavors, but these were so delicious that I am afraid to.  How can you top them?  Ooooh!   I just found a recipe for salted caramel macarons.  That's next!


Tuesday, May 21, 2013

Part of a Kitchen


It would be nice to finish one project so we can move on to the next.  The garden is only almost done.  And then we worked on the kitchen.

We have all the cabinets, but there is a lot of work to be done.  First the upper cabinets had to be installed.  You don't want to be reaching over base cabinets to install the wall cabinets.  The problem with installing the upper cabinets first is you forget they are there and stand up or back into them.  Mostly with your head.  This can be painful.  Don't ask me how I know.


A trick you might not know about involves a long board screwed to the wall.  Of course it has to be the right height and perfectly level. But after that, you place the bottom of the cabinets on the board and they will be the right height and perfectly level.

Oh, you naïve fool.  Of course they aren't level.  You bought them from a store.  And the store bought them from China and they were shipped across a great ocean in a hot container and then trucked cross country.  Even if they started out perfectly square and level, they aren't NOW!

But you have a board to rest them on so that the wife (me) can hold them up without whinging (that's Brit speak for whining).  Then the husband (Lee) can use wooden strips in gradually increasing thicknesses, called shims, to finish the whole leveling process.  They don't just have to be level from side to side.  They have to fit together and be even across the front.  Now you also have to remember that the walls aren't straight.  They weren't shipped in from China, but they were installed by guys in a big fat hurry to be paid so they could go home.


All this means that the wife has to hold us the cabinet for a long time and the husband has to make sure the screws go into studs.  Otherwise they will fall off the wall with all your dishes!  He also has to make sure they are even and symmetrical, because if not, every time he looks in the cupboard it will bug him.


Then you have to screw the cabinets together.

Trust me and put up the board.  This does mean there will be holes in the wall to be fixed when the board comes down.  On the other hand the wife is planning to install a tile backsplash and it just might go up to the bottom of the wall cabinets and then she won't have to fix the walls.

Next the bottom cabinets have to be installed.  Oh, wait.  Some of the electrical boxes are either too high or too low, so now you have to move them.  Oh, goody.  We waited until the appliances came to make sure we were leaving enough room to put them in and not too much room for big old gaps.  Once again, you have to use shims to level the base cabinets.  You didn't expect the floors to be perfectly level for 13 feet, did you? 


Here is the weird part.  The corner cabinet is a lazy susan to make the most use of the space.  But it doesn't go all the way to the back.  Why is this???


I have no idea.  If it just went MOST of the way back we could just use blocks of wood to secure it.  But, no.  There was a gap of almost 8 inches all around.  We have always had custom built cabinets before and never saw these weird things.  This is the second kitchen in the house and a kitchenette, really, so we went with stock cabinets.   It meant we had to build a frame work to screw the cabinet into.  We also had to install a 2X4 along the back for the counter top to rest on.


Then we cut and installed another set of 2X4s along the back side of the cabinet.  Then we cut a short piece to hold the cabinet away from the wall so that it lines up with the other cabinets.  We have planned the range on one side and the dishwasher on the other side, so there was a big of wiggle room.  But we still wanted it to be perfect.  Lee used screws to go up under the two long strips and now the cabinet is secure.  Just to be sure, we cut 2 sections of pressure treated 2X6s to go behind the cabinet on the floor.  This will prevent the bottom from going back if bumped.  The counter top will hold the rest.  Not Going Anywhere. 


We need to get a few more things done and then we can call for the counter top guys to come and measure.

doors and drawers


I WAS going to build a tile counter top, but Lee and I have both reached DIY fatigue.  I think this is a true disability and should be treatable with...I don't know...professional guys and adult beverages.  So a professional guy will cut and install me a granite counter top.  And I will go drink an adult beverage.

We are now part way through building the kitchen.  And then we have the bathrooms.....  Can I get a pitcher to go?

Monday, May 20, 2013

MOSTLY planted

Whenever I use the word MOSTLY , I think of The Princess Bride where Wesley was MOSTLY dead all day.  Love that movie!


I prepped the garden last week.  It is amazing how much better the soil is each year.  Now we even have worms!.  Every time I cleaned up after the horse on a rainy day, I would throw a bunch of worms in the bucket to add to the compost.  Then the composted horse droppings were added to the  next garden.  Now the garden soil is soft and wormy. 


Check out who is watching me work this morning.  Perhaps she is scoping out where she will steal the fruits (vegetables) of my labor.  Can you see her?  How about now?


Today I rolled out the weed cloth and staked it down.  I didn't have quite enough for the whole garden...I guess I got cheap when buying it and didn't get enough. 


I hate it when that happens.  Rather than going all the way into town to buy more, I decided I could weed the areas where the soil isn't covered.  Chances are I won't weed that either, but it won't be a lot of weeds and they don't scare me!  The open spot is where the rhubarb will go.


I usually shop for my veggies at Sharin' Flowers.  It is a collection of greenhouses on Highway 11 and is just down the street from us.


They don't usually have everything I want, so I go to the greenhouse at the other side of Buchanan.  Support your local gardeners! They weren't open yet, so I went home and planted what I had.


I bought two big tomato plants.  I try new kinds each year and can never tell you from year to year which I buy and which is the best.  Don't ask, don't tell.

I also bought a Roma...that I know for sure.  Then I bought some yellow squash and some herbs.

I always buy basil and it does very well.  My lavender is coming back after a cold winter,  so I don't need any more of that this year.  It makes for some nice lavender bread and cookies.  I may try to make some sachets for the closet in the B&B this year.  That way it will smell nice and not all closed up when it isn't being used.

Next I bought some Rosemary for cooking with meat or potatoes and some cilantro.  I don't hold out much hope for the cilantro.  I have grown it before and after the first time I cut it, it got all leggy and bloomed and that was that.  But hope springs eternal, so I will try it again.

Sharin' Flowers was out of zucchini and didn't plant any rhubarb, so I went home and planted what I had.  It is supposed to rain all week and I wanted to get the first batch of plants in the ground.


I cut an X in the weed cloth and dug a hole for each plant.  Here is where I have to confess.  It is so late in the year, that I didn't buy the wee tomatoes in a 4 or 6 pack.  Oh, no.  I bought the tomatoes in the gallon pots.  That way I won't have to wait until summer is over to have some garden fresh tomatoes.  So I had to cut a BIG X and dig a big hole and now I will have to remember to check the plants for fruit.  Now that I don't have to go past the garden to feed the horse, I may forget it is there!


Later in the afternoon I bought three zucchini and planted them.  The rhubarb she planted won't be ready until next week.  I am thinking about rhubarb pie and bread and maybe some muffins.    I might get a big box of strawberries from Sam's Club and make strawberry rhubarb jam.  Doesn't that sound good?

I better hurry up and lose weight.  I need to start baking again. 

Sunday, May 19, 2013

Blueberry Pie


I had company this weekend and so I got to go off my diet.  YAY for company!  It is a self-imposed diet, partly determined by my upcoming high school reunion and partly by the fact that my pants are getting tight.  I don't know most of those people well, but they have likely been living in the LA/Orange County area and there is a strong chance of embarrassing my not-so-slim/wrinkly self.  So the diet.  But blueberries are so good for you that I have convinced myself that this is a health food and I should be able to eat health food on ANY diet, RIGHT?


Blueberry Pie

6 cups fresh or frozen blueberries, thawed and drained
1 teaspoon lemon zest
1 Tablespoon lemon juice
1/4 cup flour
1/2 cup sugar
1/4 teaspoon cinnamon
2 Tablespoons butter, cut up

2 uncooked pie crusts.  Treat yourself and buy them!


If you are going to make this using frozen blueberries, give yourself enough time to thaw them.  They will end up sort of soft and squishy and you will have to drain off a little blueberry juice.  IT WILL STAIN, so be careful!

AFTER they are defrosted and drained, get out the pie crusts,  I like the Kroger and the Pillsbury version, and let them warm up a bit.  Assemble all the other ingredients.


Preheat the oven to 425.  Spray a pie plate with Pam.  Unroll one of the crusts and place in the pie plate.  Press it gently in place.

Place the blueberries in a large bowl and add the lemon zest and juice.


You can carefully zest a lemon and measure it and then juice the rest of the lemon and measure that.  But I didn't.  I just zested the whole lemon and then squeezed the lemon and used the whole shebang.  I love lemon after all.

Sprinkle the flour, sugar and cinnamon on the blueberries and gently mix.  Spoon into the prepared pie crust.  Cut up the butter and dot the top of the berry mixture.


Unroll the last pie crust and center on top of the berries.  You can make cute cutouts with a small cookie cutter first, but I didn't have any so I just stuck the top crust on and crimped the edges together.  That's faster anyway!  Don't forget to cut a few slits in the top to let the steam escape.


If you wish, you can add an egg and milk wash on top


To do this whip up an egg and a Tablespoon of milk and brush the top of the pie.  I sprinkled a Tablespoon of sugar on top of the egg wash.  None of this is necessary, but it gives the top a shiny surface and the sugar adds a little bit of sweet to the crust.


Bake for 30 to 40 minutes or until the crust is turning a golden brown.  Mine got a little too brown at 35 minutes, so check at 30 minutes.   Let the pie cool until just warm or the blueberry filling will ooze all over the place and will not stay in a pie shape.  And you might burn your tongue. So curb your cravings and let it sit, at least 30 minutes to an hour.

Serve with vanilla ice cream.  The ice cream will melt from the warm pie and ooze all over the plate.  When you are done with the pie you will be tempted to lick the blueberry cream puddled on your plate.  Use a spoon, unless you are by yourself and no one will see your blue nose and chin.  Why not?   You have totally blown your diet and the next week will be boring, so indulge for now.